
mConnect by Skooler
HOW-TO
Content
- Connecting the app to your Microsoft365 platform
a. Log in and grant permissions - Connecting to your Moodle™ learning management system
a. Set up the Moodle™ API
b. Create a new dedicated user for the app
c. Set correct user rights and privileges for the app
d. Create and obtain the token for the app
e. Connect the app’s Management Portal with Moodle™ - Additional configuration steps
a. Enable iFrame support
b. Match and synchronize users - Optional: Microsoft365 Integration plug-in configuration
a. Install the Moodle™ plugin
b. Register and integrate Moodle™ with Azure AD - Optional: OpenID Connect Authentication plug-in configuration
- mConnect Get started Guide (VIDEO)
Before you start
The mConnect app by Skooler (“the app”) connects to and fetches information from two platforms that need to be installed before you can start the setup process explained on this page.
These two platforms are:
- Microsoft365 with Teams
- Moodle™ learning management system. Version 3.5 is required and version 3.8 is recommended to utilize all services offered by the app, such as creating team channels for groups in a course.
For the app to be able to access all the information it needs from both M365 and Moodle™, the proper access rights must be assigned to the app during the setup process. This can only be achieved if a Moodle™ user with admin rights and a M365 Azure AD user with Global Administrator (not regular admin) rights are involved in the setup process. After the installation process there is no need for a M365 Global Admin user.
You can start with the M365 integration and at a later stage continue the Moodle part without losing any information. There’s no need to wait with the setup process. We recommend you log out from all browser windows and applications using your personal M365 account before you start the installation as a Global Administrator.
1. Connecting the app to your Microsoft 365 platform
The app’s management portal, which is where you start the installation, is found here: https://mconnect.skooler.com/
a. Log in and grant permissions
Your first step is to make sure the app is given the correct consent and app permissions in M365 / Azure AD so it can communicate successfully with your M365 environment, both during the setup-process and once the app is installed and in use.
Important: The app needs access and permissions to both M365 (Azure AD app registration through the Microsoft Graph API) and the Moodle™ environments involved (API). It is important to mention that these permissions, both in Azure AD and Moodle™, are permissions you give us, and you may retract them at any time. Please contact your Skooler Account Manager or mconnect@dev.skooler.com if you have any questions or if you need granular control of the admin-granted permissions.
Sign in with your M365 Global Administrator user account here https://mconnect.skooler.com/
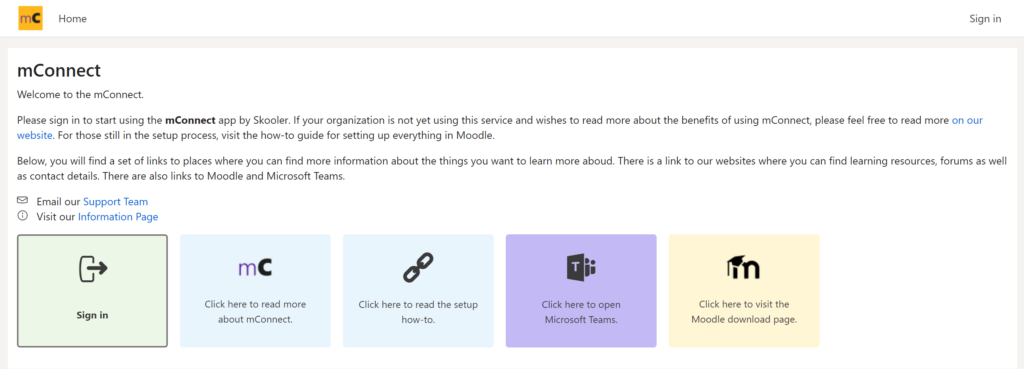
The first time you log in, you will be asked to accept the approvals needed for the app to be installed.
Accept the following permission:
- Sign in and read user profile (Reads basic details about this user after signing in)
Click Accept
In the next step you need to enter details about your organization.
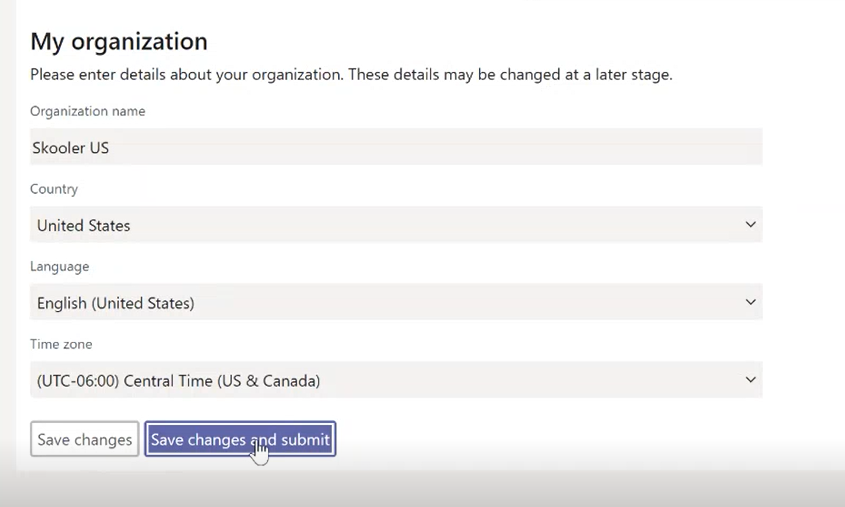
Click save changes and submit.
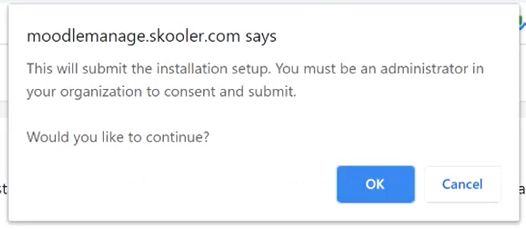
Click OK on the pop-up window.
In the pop-up window that appears, select the correct M365 account and confirm that you are still logged in as a Global Administrator in your Microsoft365 .
Now you need to accept the relevant permissions for your organization.
Important: The permission ‘Read and write all users’ full profiles’ is currently not in use and is only there for future needs. It is meant for a specific feature which is not yet implemented. You can remove this permission after installation by following this procedure: https://docs.microsoft.com/en-us/azure/active-directory/manage-apps/manage-application-permissions
When a new version of mConnect is released, this permission can be manually approved in the mConnect Management Portal and then removed immediately following the same procedure.
Permissions:
- Deliver and manage all user’s notifications. Will be used in the Teams Bot part to get and set notifications and actions for signed-in user. For future use.
- Sign in and read user profile. Reads basic details about this user after signing in.
- Read and write all groups. Creates teams from Moodle™ courses.
- Read organization information. Used during onboarding to get correct name and details about customer.
- Deliver and manage all user’s notifications. Will be used in the Teams Bot part to get and set notifications and actions for signed-in user, for future use.
- Read and write all users’ full profiles. Not in use. See more details above.
Please contact mConnect support on mconnect@dev.skooler.com for more details and how you can granulate permissions.
Click Accept button
You are now directed to the app management portal and you can see that you have successfully completed the two first steps 1) enter organization details and 2) Grant permissions in Azure AD.
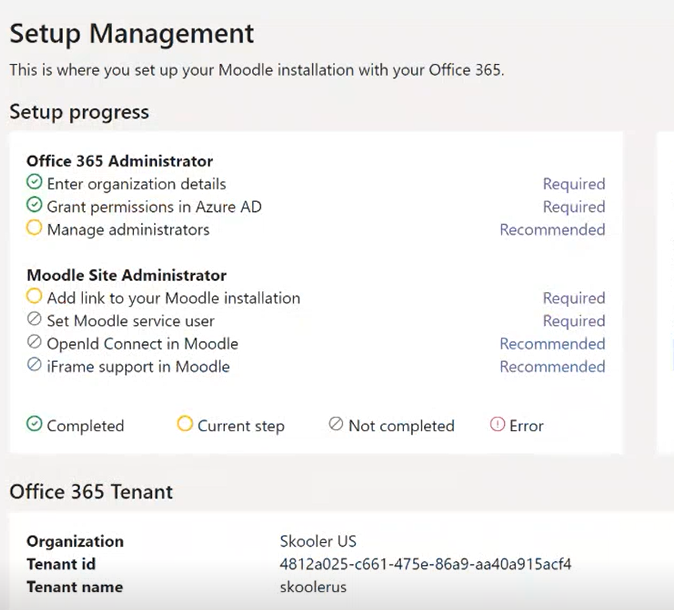
As an extra step to confirm the setup is successful so far, you now need to click the button “Test admin app” in the section Microsoft365 Tenant.
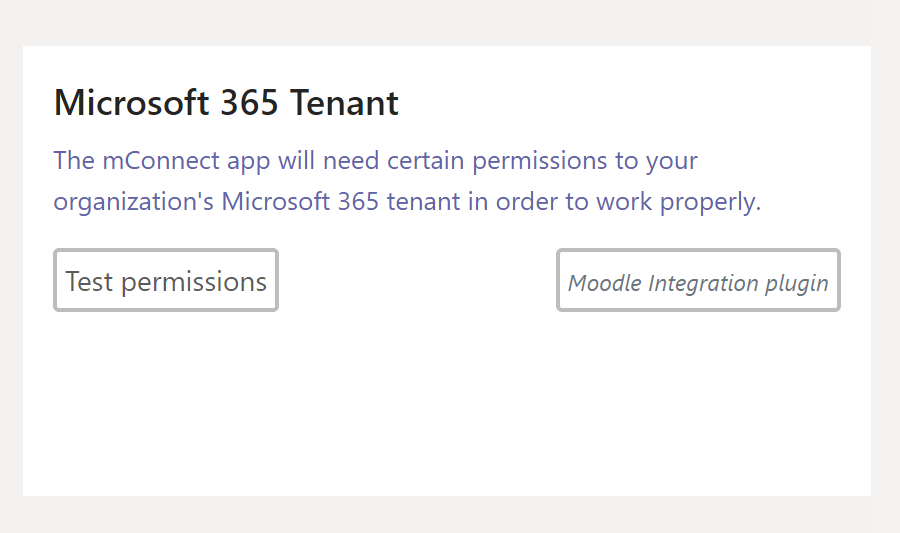
A pop-up saying App registration test successfully completed! will show and you click OK.
Step number 3 “Manage administrators” is not actually a step you have to complete to be able to progress to the next steps. This step is to remind you to create the correct number of Administrators you would like to have in the app. We recommend that you add at least one Administrator in addition to yourself.
You can manage your Administrators by clicking ‘Manage Administrators’ in the top menu. You will now see a list of current Administrators and you can add new or retract the role for each person in the list.
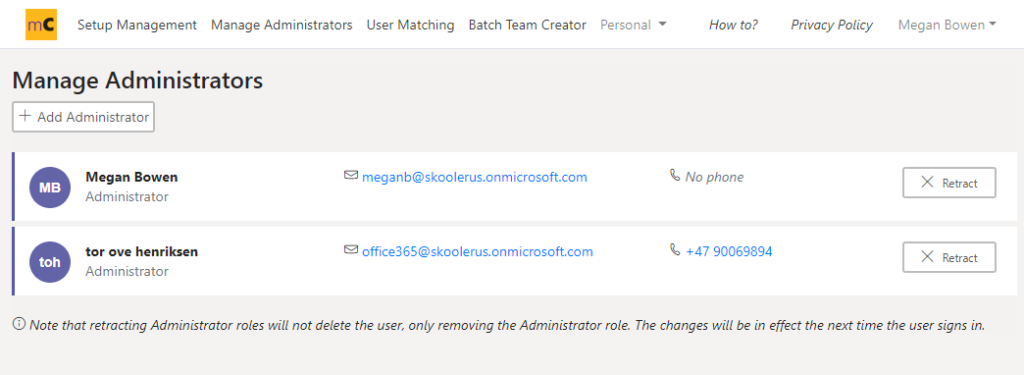
To add administrator from your organization, start typing the name of the user you want to add as administrator, press enter to start search, find the user in the search result, and click on that person to add it as administrator.


Click Set Administrator role when you have the complete list of users added.
You have now completed step three.
2. Connecting to your Moodle learning management system
Now you need to set up your Moodle installation to be able to communicate with mConnect. The next steps must be done by a Moodle admin user with admin rights in the Moodle installation you are connecting. Note that if you have one test Moodle and one live Moodle, you need to connect them by following the same procedure twice.
Before you start make sure you are logged out of all other Moodle windows and sessions.
a. Set up the Moodle API
The Moodle API is used by the app for fetching information from Moodle and show it in Teams.
Log in with a Moodle user with administration rights (not your M365/Azure admin)
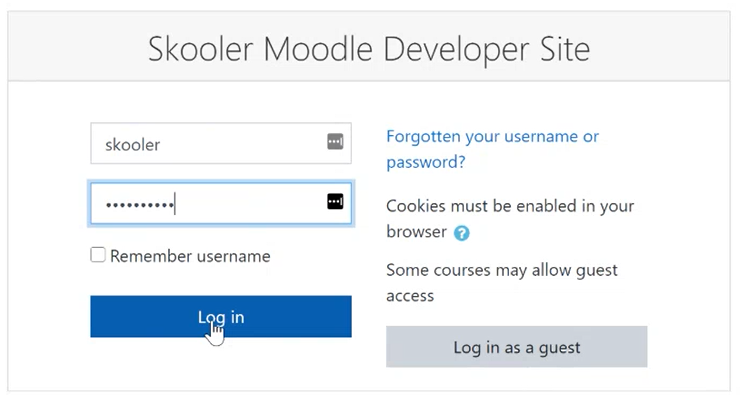
Navigate to “Mobile settings” (Site adminstration -> Mobile app -> Mobile settings)
URL: /admin/settings.php?section=mobilesettings
Check the box next to “Enable web services for mobile devices”.
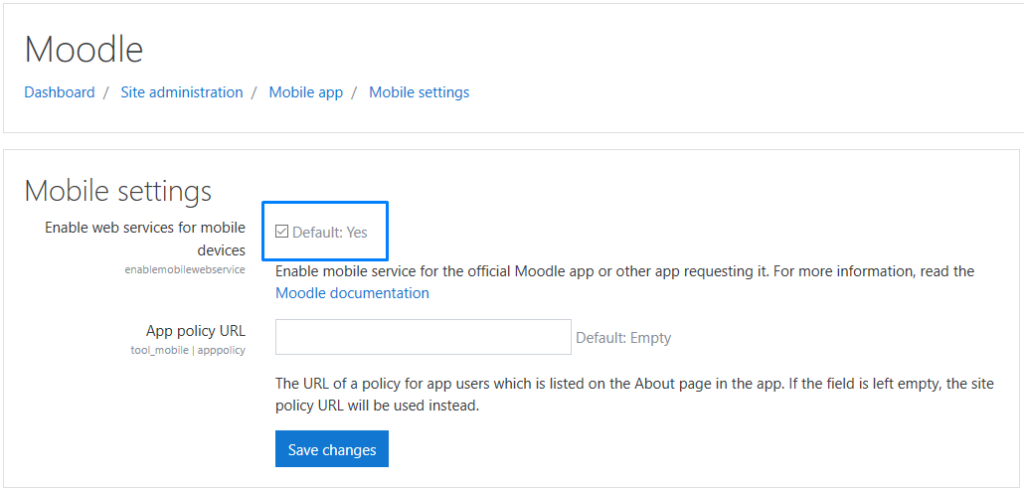
Click save changes button.
b. Create a new dedicated user for the app
mConnect will need to be created as a Moodle user in order to access the information in Moodle through the Moodle API. This is the user that will act on behalf of the app, but is only used for the functionality defined in the app. mConnect doesn’t require any Moodle plug-ins to be installed.
From the previous steps you are already logged in as a Moodle admin and will just continue with this same user for this step.
Navigate to Site administration -> Users -> Accounts -> Add a new user.
URL: /user/editadvanced.php?id=-1
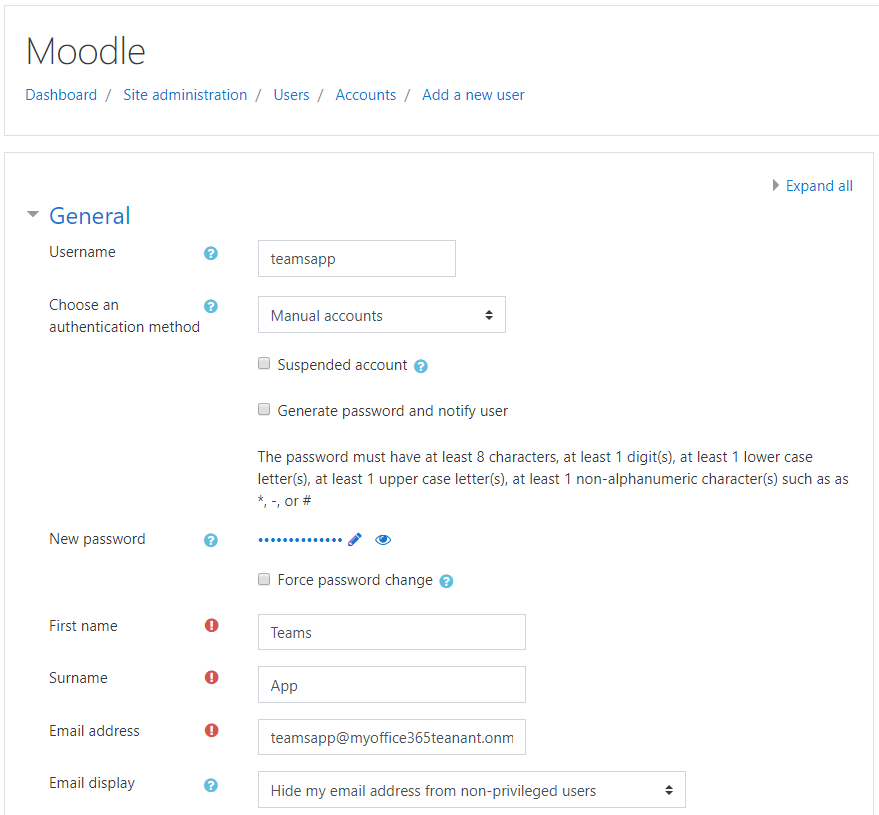
Username for this user should be set to: teamsapp.
Set authentication method: Manual accounts.
New password: Set a strong password where you see the pen and the eye.
Set first name: Teams Set last name: Apps
Set email: Enter a valid email address assigned to this user that is created in your domain. This email cannot be used by any other Moodle or M365 users. The app will not send emails to this email address or expose this email in any way.
Email display: Hide my email address from non-privileged users.
c. Set correct user rights and privileges for the app
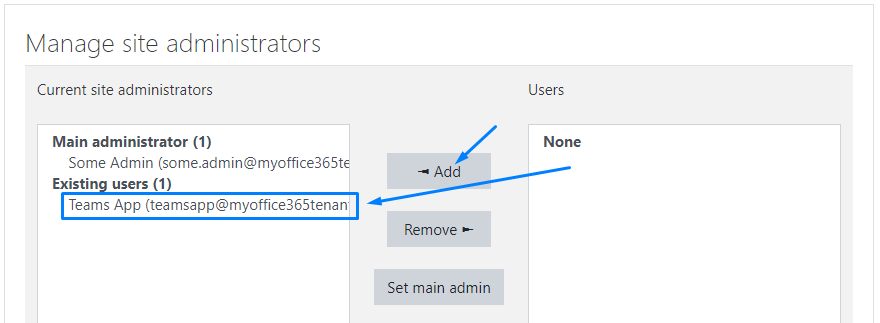
The user teamsapp you just created needs to be given the role Site administrator. From the previous steps you are already logged in as a Moodle admin and will just continue with the same user for this step.
Navigate to: Site adminstration -> Users -> Permissions -> Site administrators.
URL: /admin/roles/admins.php
In the right pane you will already see the user teamsapp or you can search for it using teams as search criteria. Then you click on the user teamsapp to select it and press the “Add” button located between the two panes in order to move this user from right to left side.
d. Create and obtain the token for the app
Now that you have created the teamsapp user and given it the correct user rights, it is time to create a token for the teamsapp user. From the previous steps you are already logged in as a Moodle admin and will just continue with this same user for this step.
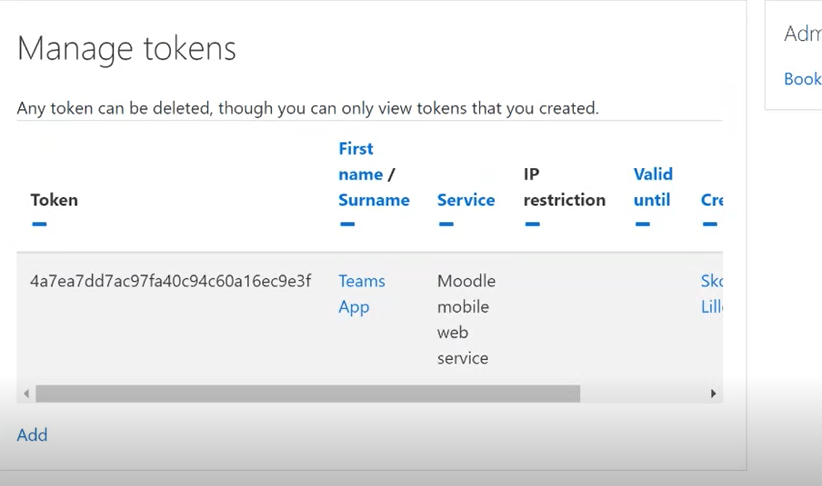
Navigate to Site administration -> Plugins -> Web services -> Manage tokens.
URL: /admin/settings.php?section=webservicetokens
Click “Add” below the table to create the token for the teamsapp user.
A new window named Create Token will open.
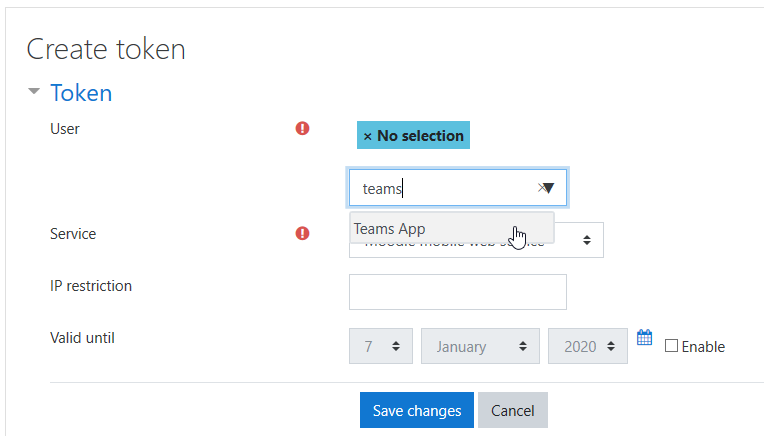
Search for the user (“Teams App”) and click to select it when it appears. The user will now be listed where it says No selection on top of the window.
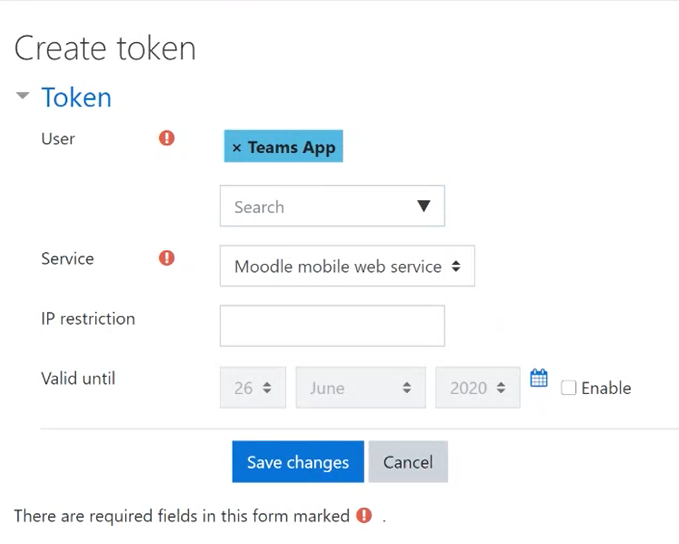
Set service: “Moodle mobile web service”.
If you want to set a validity period for the token, make sure you set a date in the future and you are aware that the app will stop working on that date. You will then need to re-do the token process all over again in Moodle, downtime may occur at this time and add the new token to the mConnect Management Portal.
Press “Save changes” button to create the token.
You will now see the generated token for the teamsapp user in the table.
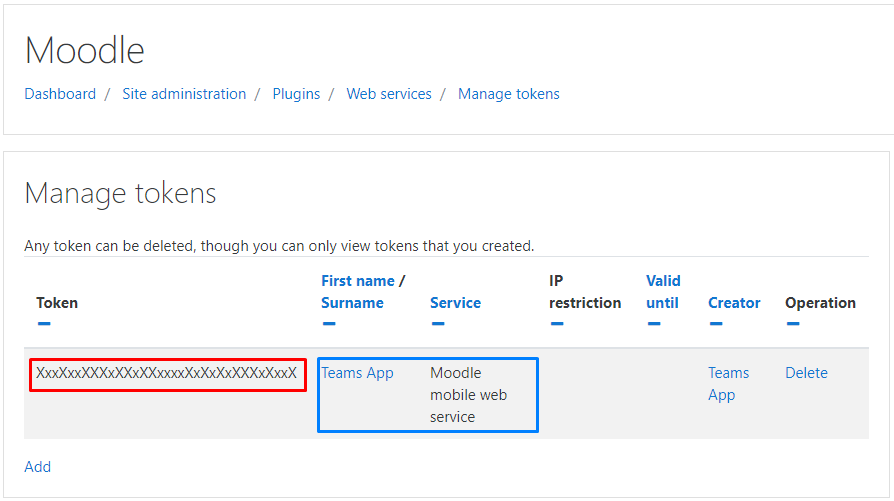
This Token will soon be copied and pasted into the apps Management portal, so it is connected correctly to the teamsapp user. You can keep this window open or copy the token to a safe place until you will paste it into the apps Management Portal.
e. Connect the app Management Portal with Moodle
For the app to successfully connect and obtain content via the Moodle API with the teamsapp user, the app Management Portal must be connected to Moodle with a few steps.
Navigate to “Setup Management” tab found here if you have closed the window you used earlier in the setup process: https://mconnect.skooler.com/manage.
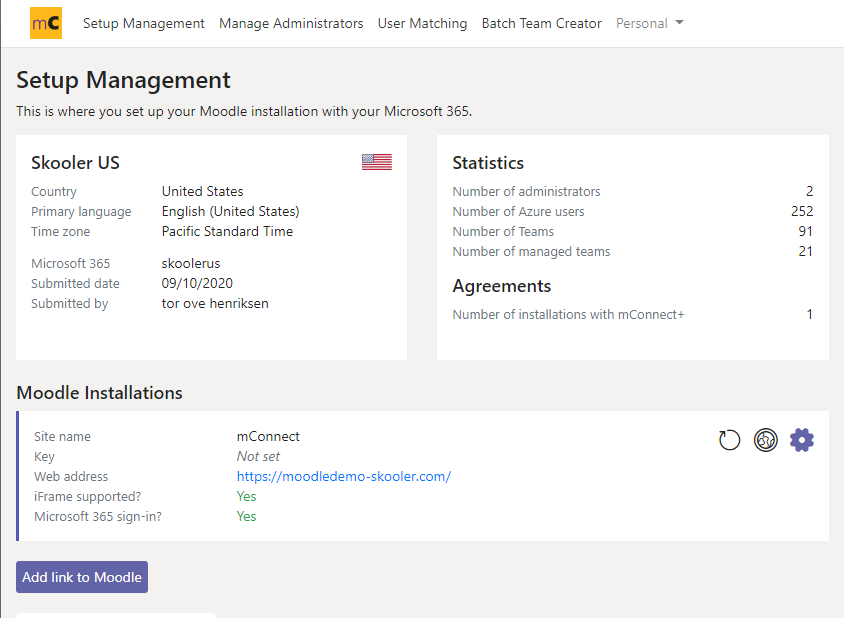
Click button “Add link to Moodle”. In this screenshot we have already linked one Moodle, but you can add more.
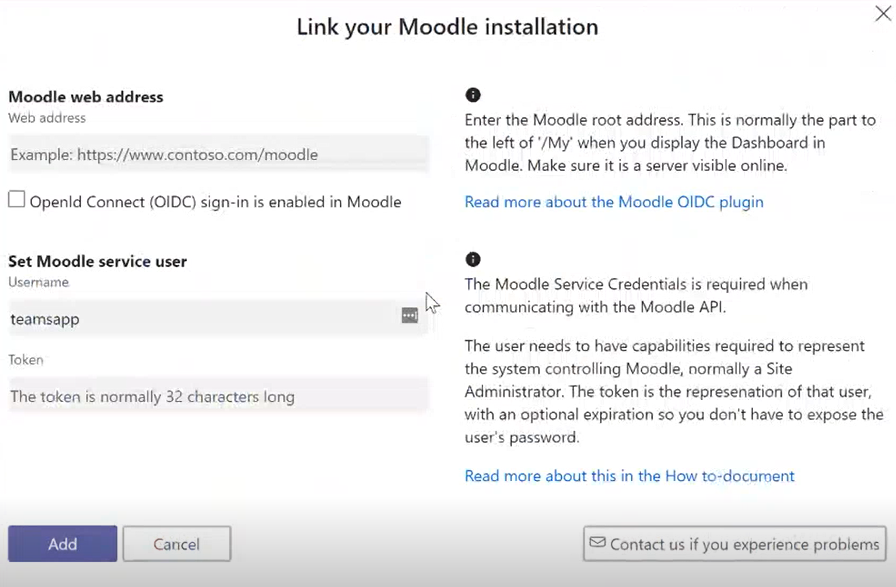
You can copy the URL for your Moodle installation from one of the Moodle windows you used earlier in the setup process if you have not closed that window and you should include the forward slash / at the end.

If you have decided to use single sign-on with Open ID Connect, you check this box now to tell the app Management Portal that you will install this in Moodle later in the setup process (instructions will follow later).
Now fill in the username of the app you previously created in Moodle: teamsapp and the token you created for this user. You may have the window with the token still open and can copy and paste it into this field.
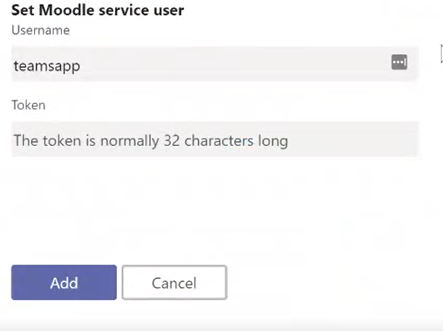
Click Add.
Congratulations you have now successfully connected the Moodle installation to the app Management portal and your Moodle installation will show up in your Setup Management dashboard.
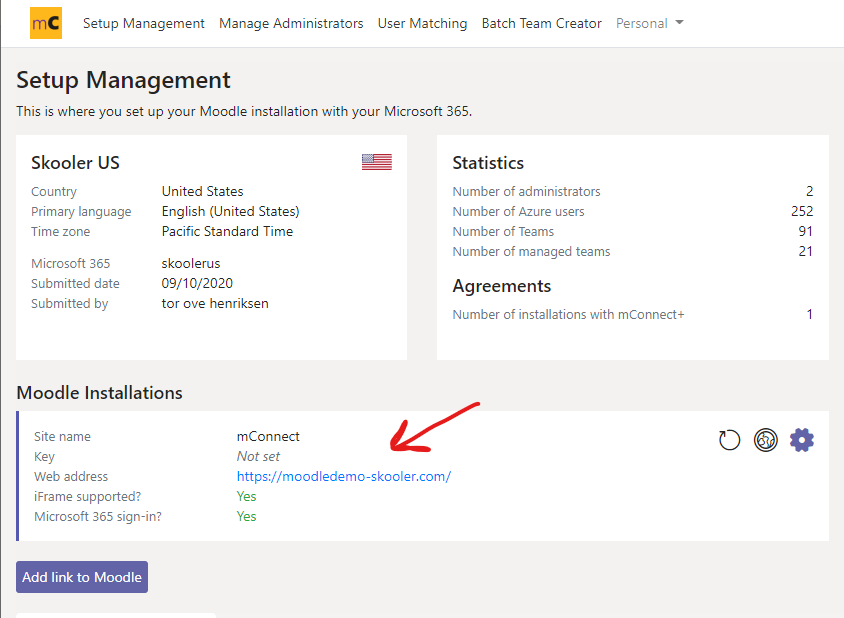
Now you need to verify that the connection to Moodle is working correctly by clicking the button “Test Moodle link” and you will receive a message Test successfully completed!

3. Additional configuration steps
In this section we have collected the recommended steps that will enhance your learning experience and get the most out of our app.
a. Enable iFrame support
Our recommended way of showing your Moodle content inside Teams, is to use iFrame. With iFrame you will use your Moodle exactly the way you use it in a web browser today, hence your users will be familiar with this way of using Moodle. If you don’t install iFrame you will see the Moodle content in a basic Teams layout.
PS! If you don’t see your server configuration here, or you don’t have access to making these changes now, just continue on the next step, and go back to this step at a later stage. Email Support at mconnect@dev.skooler.com if you need assistance.
Log in to Moodle with your Moodle Admin user account.
Navigate to Site administration -> Security -> HTTP Security.
URL: /admin/settings.php?section=httpsecurity
Turn on “Allow frame embedding”. This setting is off (not checked) by default.
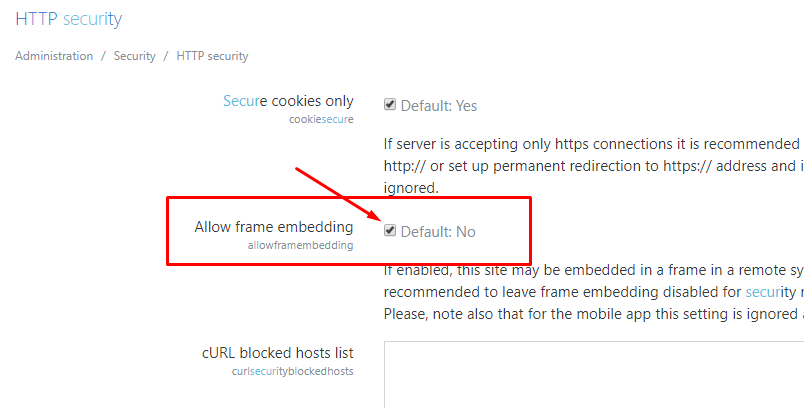
Next you need to configure iFrame support on the server that is running your Moodle service. Below you will see two alternatives you can use, but we recommend you follow the guidelines given by your server hoster / administrator.
Alternative 1: Proven to work for Ubuntu, Redhat, Apache and similar.
Step 1:
<Directory /var/www/html/example.com/public_html>
Options Indexes FollowSymLinks
AllowOverride All
Require all granted
</Directory>
Step 2:
<IfModule mod_headers.c>
Header set Content-Security-Policy "frame-ancestors 'self' https://teams.microsoft.com https://mconnect.skooler.com"
</IfModule>
add this to a file inside the apache alias directory found here on CentOS servers: /etc/httpd/conf.d/
We then add a file inside there called “security_headers.conf” and add the following:
<IfModule mod_headers.c>
Header set Content-Security-Policy "frame-ancestors 'self' https://teams.microsoft.com https://mconnect.skooler.com"
</IfModule>
Alternative 2: Other server types and if above settings for Ubuntu, Redhat, Apache and similar don’t work.
You will now configure Moodle/PHP to modify the Content-Security-Policy header. This is done in the file “.htaccess” located on the server Moodle is installed on. You will find the “.htaccess” file within the “public_html” folder. If you cannot see it, check if hidden files (aka “dotties”) are showing in the file editor. If it does not already exist, you have to create one (notice that the file starts with a dot).

Please note that an existing “.htaccess” file could already have a defined content, so please leave existing content as it is.
The “.htaccess” should contain the following lines:
Header set Content-Security-Policy "frame-ancestors 'self' https://teams.microsoft.com https://mconnect.skooler.com https://moodlemanage.skooler.com"
Download sample file here: https://mconnect.skooler.com/images/howto/example_htaccess_file.txt.
b. Match and synchronize users
You need to map each user in Moodle to the same user in Azure AD using a unique identifier. This identifier could be email, username etc. found in one of the key user profile fields in Moodle and Azure.
Log in to https://mconnect.skooler.com/ select “User Matching” in top menu and then click the “Sync configuration” button.
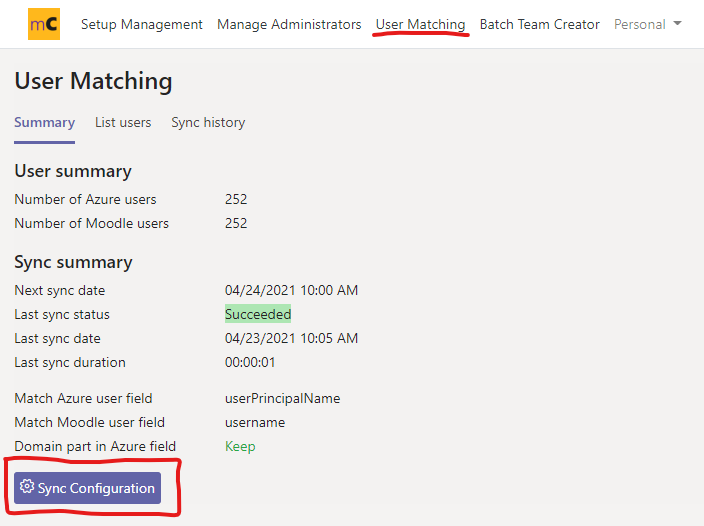
Select the matching field with the unique identifier in Moodle and in Azure AD in the two drop down menus. Select “Skip domain” if your domain-name is different in the two platforms while username before the @ is unique.
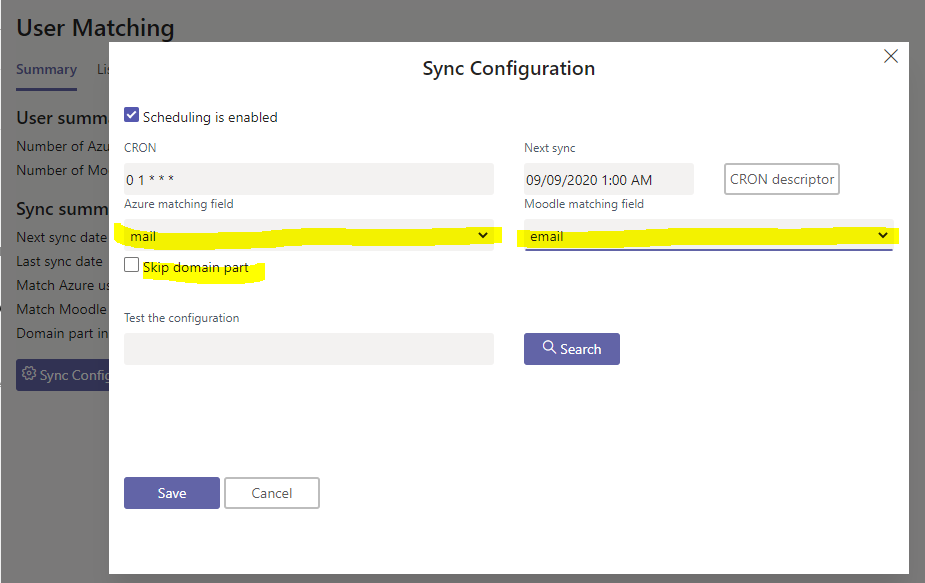
Test and verify your configuration by typing in a user’s details in the search field and click “Search” button.
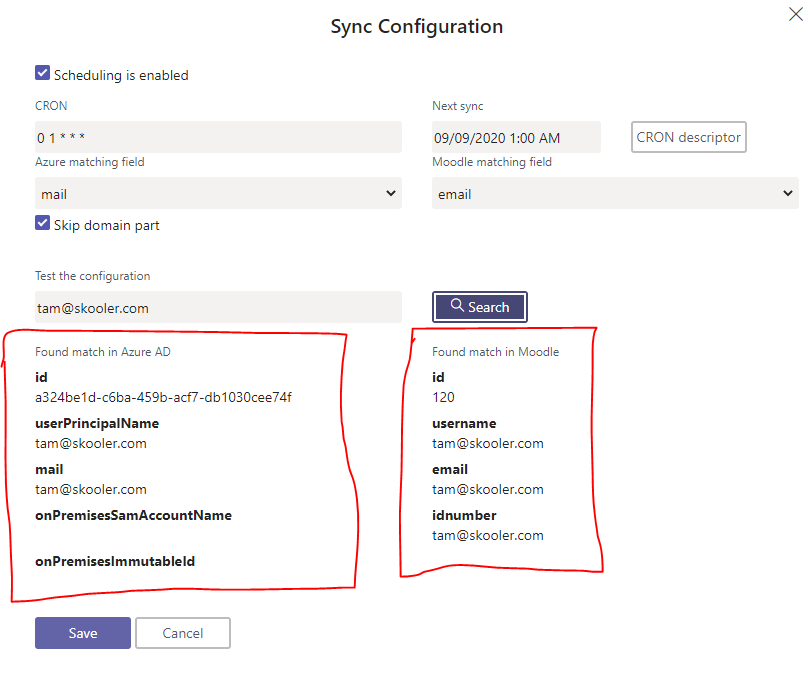
Click Save to use these fields to identity and map all Moodle users with Azure AD users. The first user-sync will be done around 1am the following night local time. How long the first synchronization will take is depending on your total number of users. mConnect will first read you Azure AD accounts, then Moodle, before mapping the users.
Important: mConnect stores the data it uses to map each user in a secure Azure datacenter in Norway. If you would like to store your data in a local Azure Data center, please contact your Skooler Account Manager or email mconnect@dev.skooler.com
The following details are stored for users:
| Object-id | The user’s object-id i AAD. Formed like this: “45c6aa80-4a30-44a6-b8d2-373520ef52ec” | Required |
| UserPrincipalName (UPN) | Username in AAD. Also simplified as “UPN”. Formed like an e-mail address. | Required |
| Name | Display name (given name and surname) | Recommended |
| Initials | Initials are shown in the small, round icons in relation to persons in a list. They are generated from the name. | Recommended |
| This is shown in lists, course details (in a team tab) and own profile page. | Optional | |
| Phone | This is shown in lists and own profile page. | Optional |
| Preferred language | The user’s language in Office 365. We store this so we can display the most relevant language in our portal. Fallback is language set in customer/organization during onboarding process. | Recommended |
| Matching-id | This is stored if users are matched based on non-standard field values, like “onPremiseSamAccountName”. | Configuration |
4. Optional: Microsoft Office 365 Integration plug-in
The Office 365 integration plug-in is only needed if you plan to use single sign-on between Microsoft365/Azure AD and Moodle. If you don’t plan to have this set-up right now, you can skip this whole section and skip the “OpenID Connect Authentication plug-in” as well.
a. Install the Moodle plugin
If you have not yet installed this plug-in, you must do that now by going here: https://moodle.org/plugins/local_o365
Log in to Moodle with your Admin user account. You will also need to be a Global Admin in Office365 or have that person available for this step.
Navigate to Site administration -> Plugins -> Local plugins -> Microsoft Office 365 Integration
URL: /admin/settings.php?section=local_o365
In the first tab named “Setup”, you can download a PowerShell script. If you are familiar with PowerShell or want to do this manually, you may install this and follow the instructions given in the plugin. You may stop reading further on these steps.

Note: There is no need to run the PowerShell script provided in the plugin details. The only part of this plug-in that is required is to enable user sync from your Azure AD to Moodle, and it is a requirement for enabling users to log in to Moodle with their Office 365 school account and a requirement for the “OpenID Connect Authentication” plugin. If this plug-in has been installed and configured already, you may skip this step.
b. Register and integrate Moodle with Azure AD
You will need to create “Application ID” and “Application Key” for the Office 365 integration.

Instead of downloading the PowerShell script provided in the plug-in, you now go back to Moodle Teams Management https://mconnect.skooler.com/manage and create it automatically. On this page you need to make sure you are logged in with your Office 365 Global Admin account. You can find the account name in the top right corner. This step will not work if you are not Office 365 Global Admin. This is because this action requires a temporary elevated admin access.
On the right side you find the button “Moodle Integration plugin”.
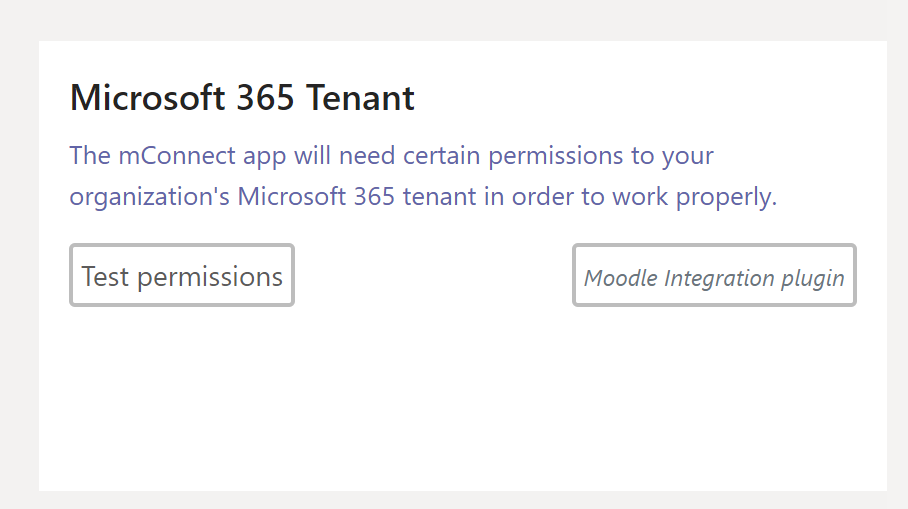
Then you click on the “Create OpenID App” button in the pop-up.
When you click the button, you will first be prompted to select the admin account. The account you are already logged in with will be showing up in the top of the list, but you are free to add any other Global admin Office365 account if you prefer.
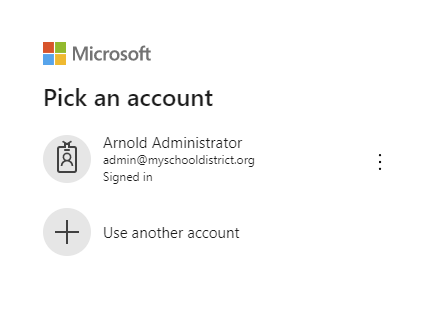
The list of temporary elevated admin access rights may look like this:
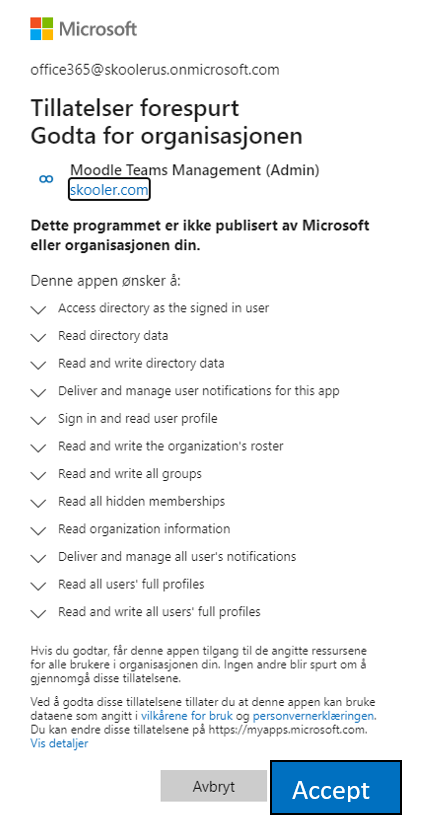
Click Accept.
If you are not able to accept, you are not a Global Admin Office365 in your organization and need to log in as one to be able to continue.
You are now redirected back to the Setup Management page and the button has changed.
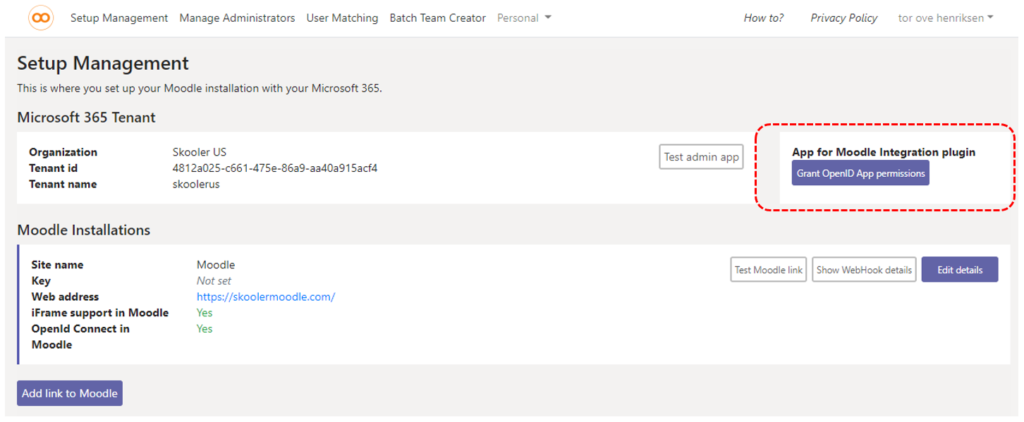
Now you need to click the button again to grant the permissions needed.
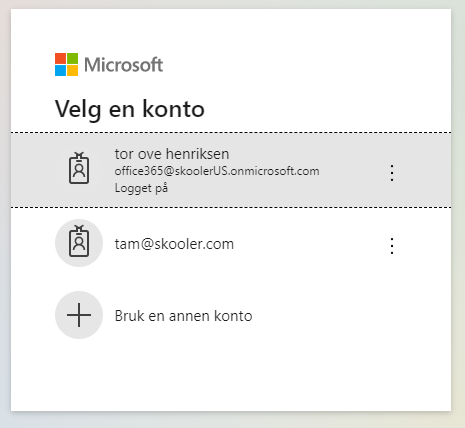
Select the Global Admin Office365 account you are using.
Accept the plug-in’s access rights.
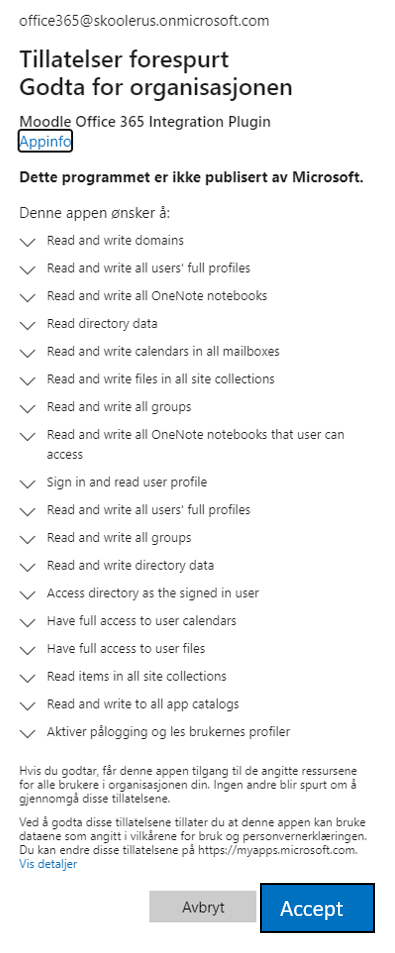
Click Accept.
The app is now fully registered and available in your Azure Portal: https://portal.azure.com/#blade/Microsoft_AAD_IAM/ActiveDirectoryMenuBlade/RegisteredApps

The OpenID app registration is now created and granted. View the details by pressing the “Show OpenID App” button.
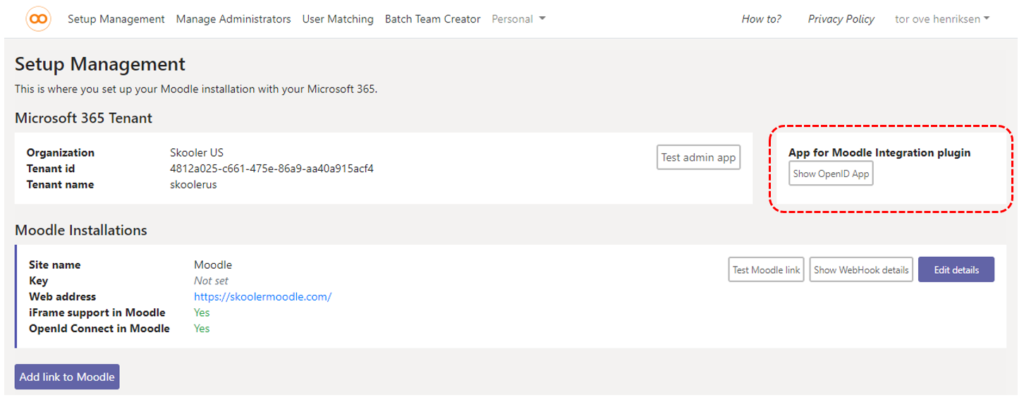
Click Show OpenID App.
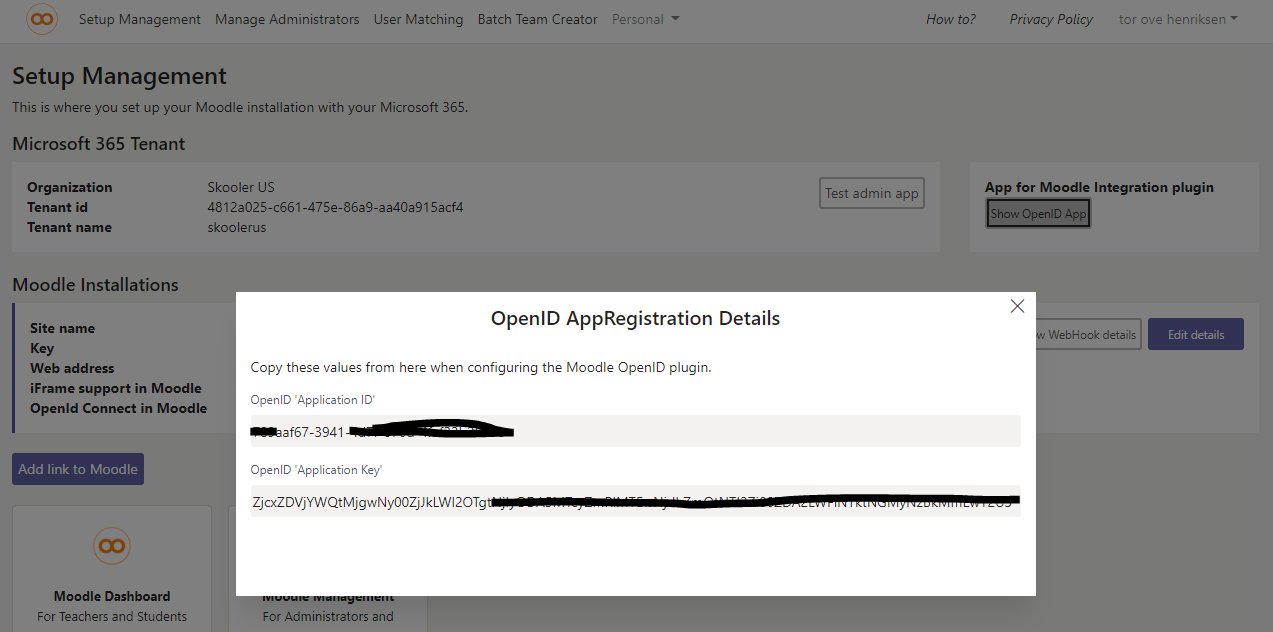
Now you copy these two fields and paste them into the corresponding fields (“Application ID” and “Application Key”) in the Microsoft Office 365 Integration plug-in that you have open in Moodle.
URL: /admin/settings.php?section=local_o365
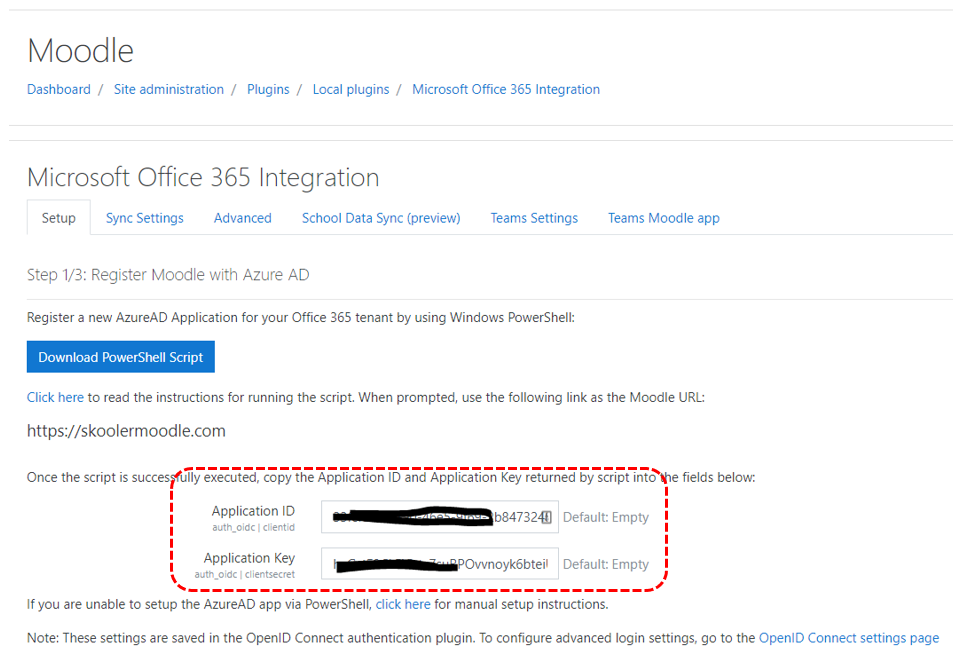
Choose connection method
Now, ensure that the checkbox for “Application access” is checked.

Admin consent & additional information
The next step is to verify that the information you have entered is valid by clicking on the two Detect buttons and get green confirmation that both are usable.
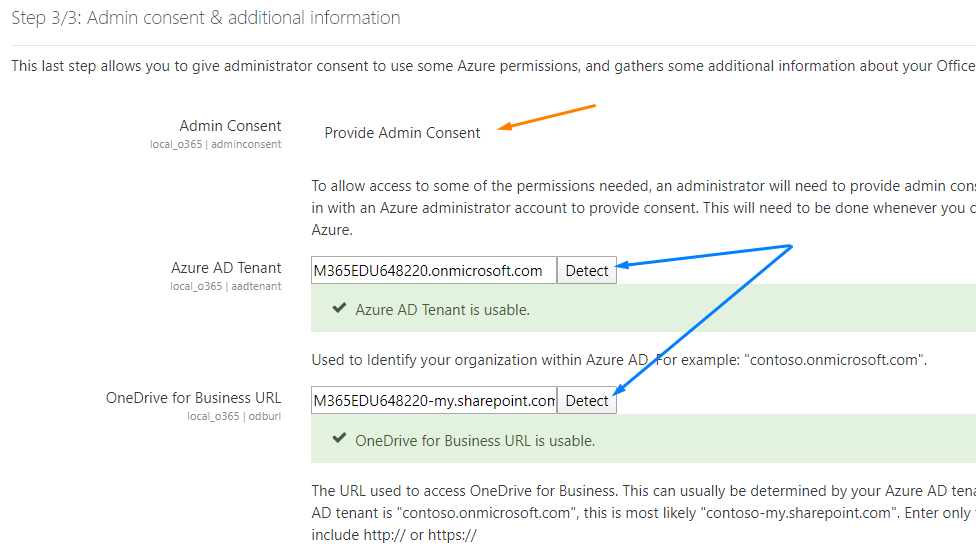
If the two statuses do not indicate success, you need to instruct Moodle to also grant access to the OpenID app registration.
Press the “Provide Admin Consent” link.
Verify setup
Your next step is to verify the setup. Click the “Update” button to let the plugin check the details you have entered.
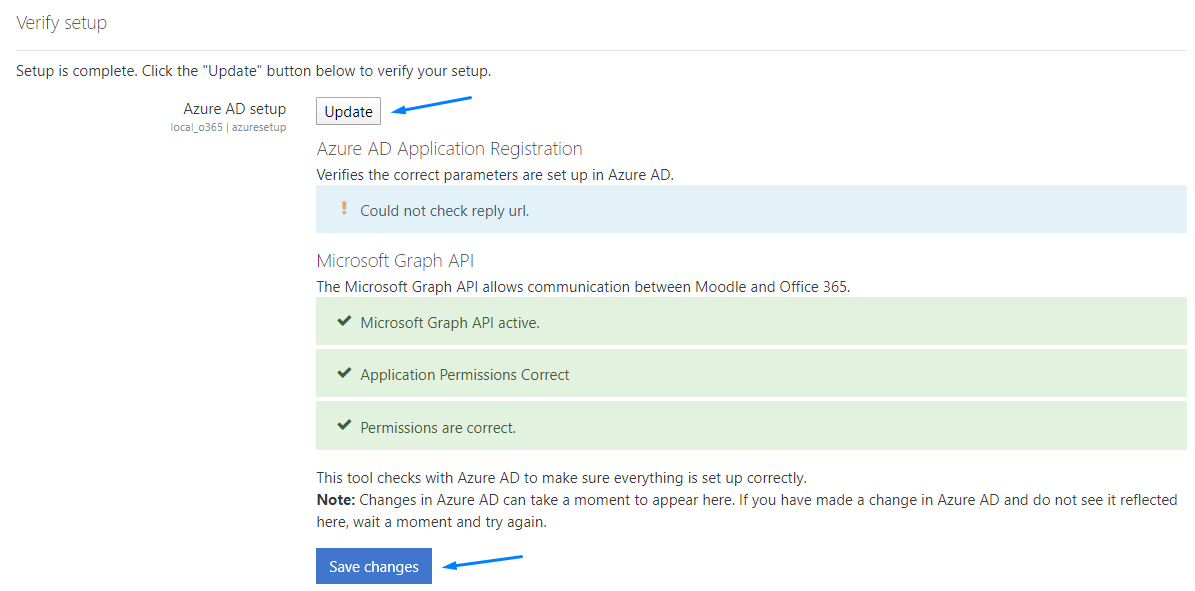
When you get the three green rows checked, you click Save changes.
User sync
Next you click on the “Sync Settings” tab.
URL: /admin/settings.php?section=local_o365&s_local_o365_tabs=1
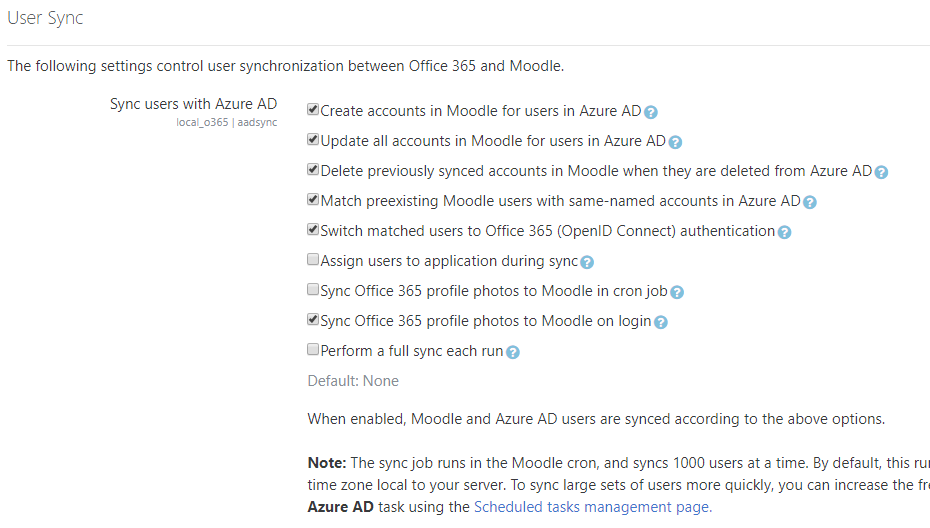
Here you check the preferred configuration for user sync. The most important settings are Create and Update accounts in Moodle. In addition, we recommend Match preexisting Moodle users and Delete previous synced accounts.
Click Save.
The remaining configuration tabs and settings for this plug-in are not needed for the mConnect app and can be left unchanged.
Note: Users will not be able to log in until the synchronization of users have been completed. According to the plug-in’s release notes this will be done in batches of 1,000 users every night.
5. Optional: OpenID Connect Authentication plug-in configuration
The OpenID Connect Authentication plug-in is only needed if you plan to use single sign-on between Microsoft365/Azure AD and Moodle. If you don’t plan to have this set-up right now, you can skip this whole section. In this section we will guide you through the configuration of this plug-in. If you have not already completed the previous step to configure the Microsoft Office365 Integration plug-in, you must complete that step before you continue.
You can download this plug-in here: https://moodle.org/plugins/auth_oidc.
Log in to Moodle with your admin user.
Navigate to Site administration -> Plugins -> Authentication.
URL: /admin/category.php?category=authsettings
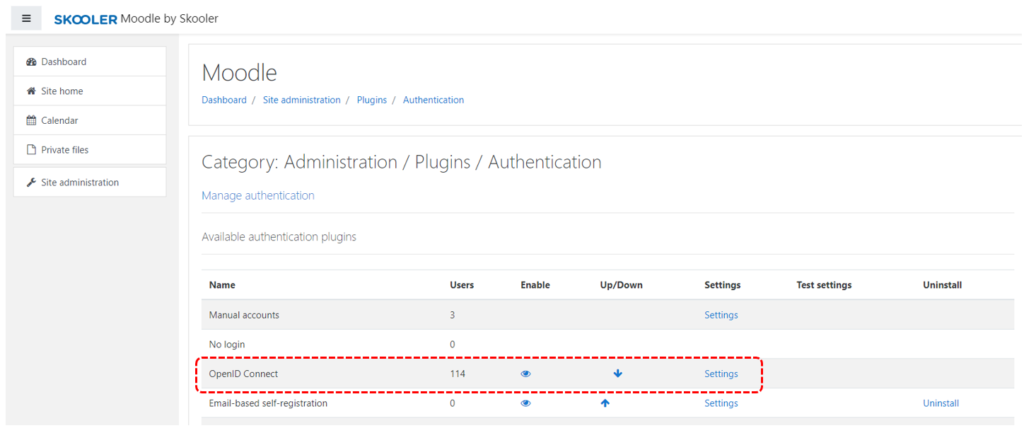
If “OpenID Connect” is not already enabled, you will still find it in the list of authentication methods.
Click the “eye” icon to enable it if it is not enabled. The “OpenID Connect” entry will now move to the top of the list as the last of the enabled authentication methods.
Move the “OpenID Connect” to the desired position and click “Settings”.
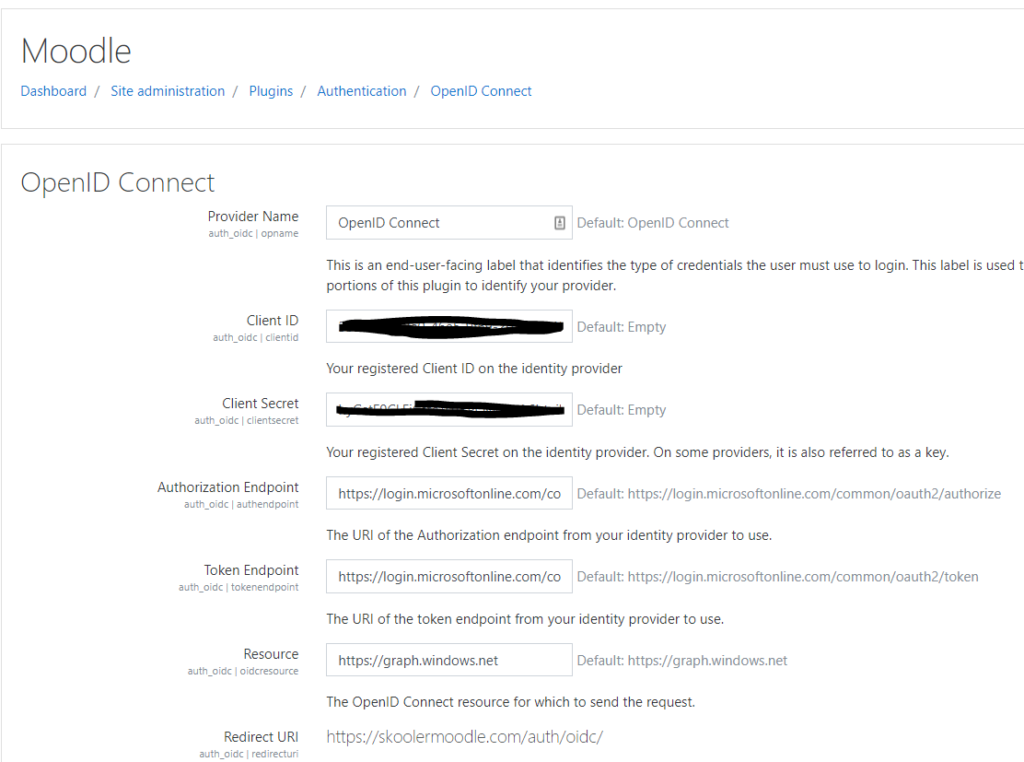
If you followed the steps for Microsoft Office 365 Integration configuration, these settings should stay as they are. You may want to verify that this information is correct as well.
Now we want to verify that the OpenID Connect sign-on authentication is working as it should. For this to happen, log out of all Office365 and Moodle accounts in your web browser, use a different browser and enter the URL to your Moodle service. The button OpenID Connect should now be present on your log-in page.
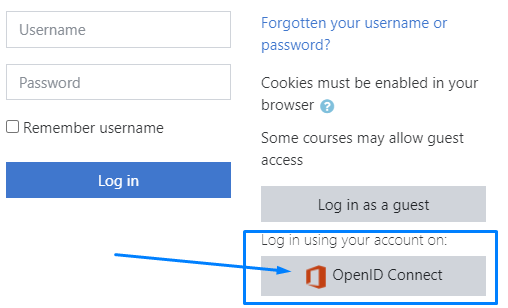
Click the button OpenID Connect to log-in using the OpenID Connect authentication method.
6. WebHooks plug-in configuration
This plug-in will enable your events and actions in Moodle to be available in a tab in Teams. You can download and install the plug-in here: https://moodle.org/plugins/local_webhooks.
Log in to Moodle with your Admin user.
Go to Site administration -> Server -> WebHooks.
URL: /local/webhooks/index.php
You will need to fill in information on this page and you will find this information on your Moodle Teams Management page: https://moodlemanage.skooler.com/manage.
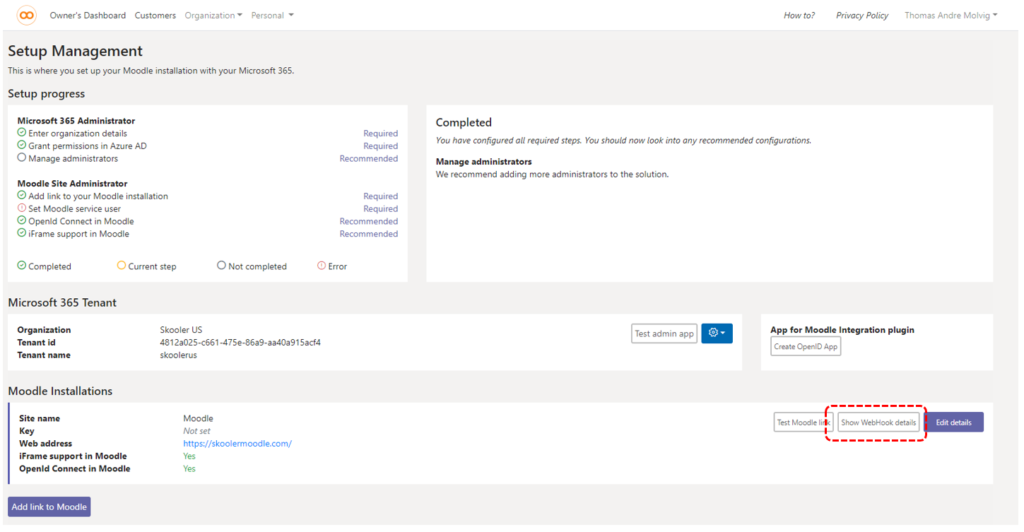
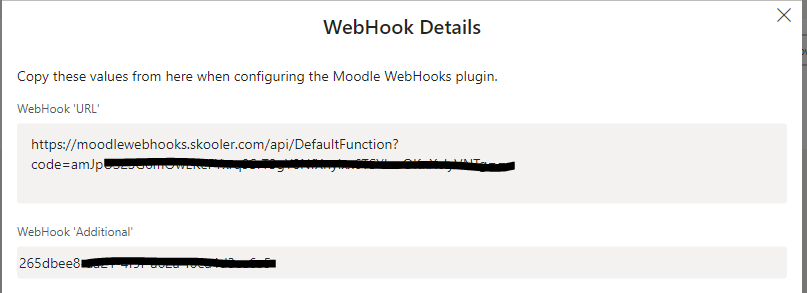
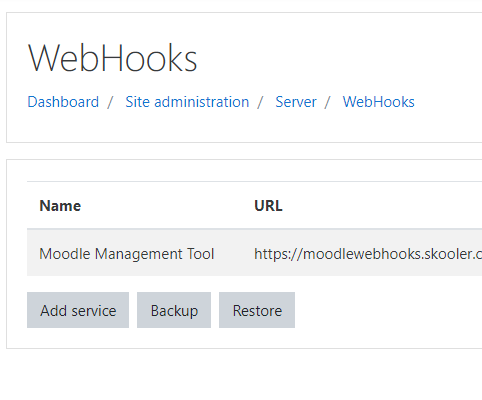
Click button Add service and this window will appear when you click Show more to expand.
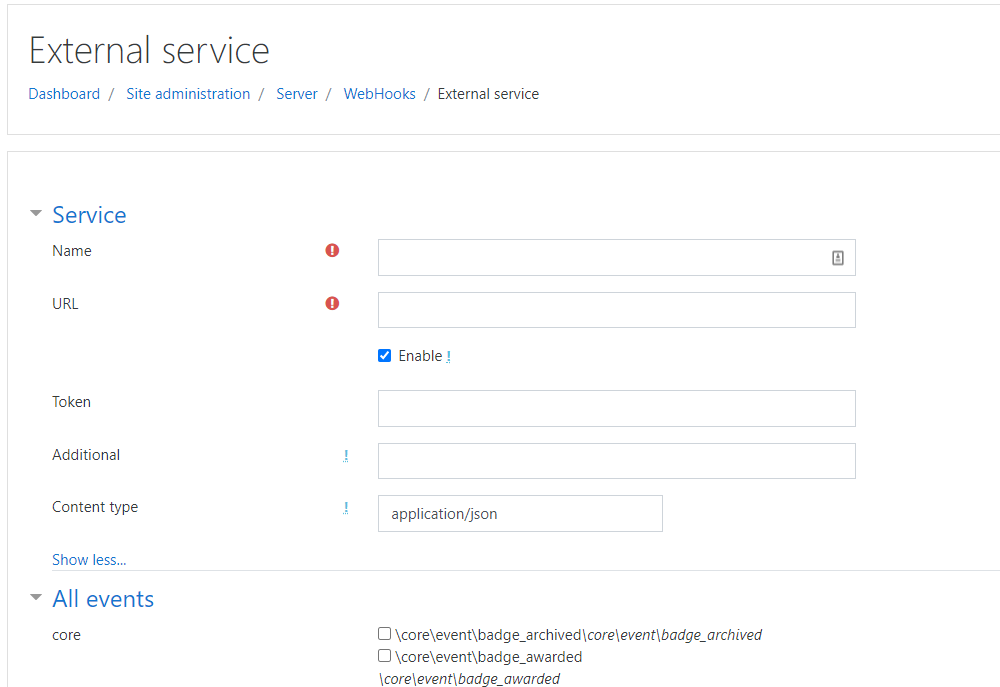
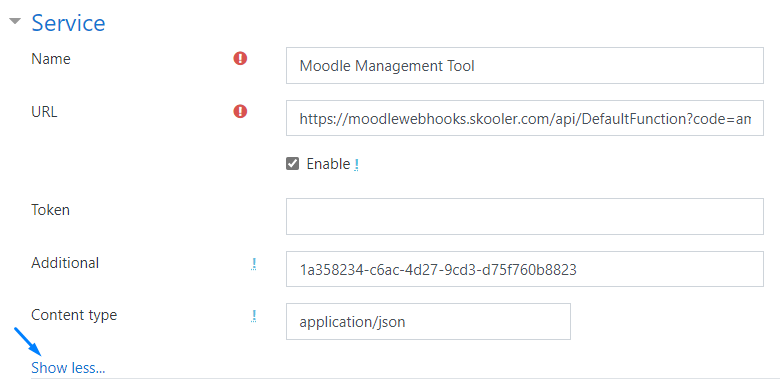
Name: Moodle Management Tool
Paste the URL from WebHooks details into URL field.
Make sure the “Enable” checkbox is checked.
Paste the Additional from WebHooks details into Additional field.
Now you will select the Moodle events you want to be shown in your Feed tab in Teams.
Here are some recommended events to select:
\core\event\calendar_event_created
\core\event\calendar_event_deleted
\core\event\calendar_event_updated
\core\event\course_completed
\core\event\course_created
\core\event\course_deleted
\core\event\course_section_created
\core\event\course_section_deleted
\core\event\course_section_updated
\core\event\course_updated
\core\event\note_created
\core\event\note_deleted
\core\event\note_updated
\core\event\notification_sent
\core\event\notification_viewed
\core\event\role_assigned
\core\event\role_deleted
\core\event\role_unassigned
\core\event\role_updated
\core\event\user_enrolment_created
\core\event\user_enrolment_deleted
\core\event\user_enrolment_updated
\mod_assign\event\submission_graded
\mod_forum\event\discussion_created
\mod_forum\event\discussion_deleted
\mod_forum\event\discussion_updated
\mod_forum\event\post_created
\mod_forum\event\post_deleted
\mod_forum\event\post_updated

When you are done you click Save changes.
If you have not yet downloaded and installed the Moodle Teams app, you can do that here.
Congratulations ?
You have now successfully configured your Moodle and Office365 services to work with the Moodle Teams app by Skooler.
If you would like to take part in our training on best practices for using the app, Support or learn more about our premium version of the app, send email to moodle.support@dev.skooler.com.
mConnect get started Guide
Do you need mConnect support? Contact our Support at mconnect@dev.skooler.com
Moodle™ is a registered trademark owned by Moodle.
